
We haven’t been able to get to the boat this week, Jane has been ill and I had a seminar on my day off.
But we have had a delivery from Jimmy Green Marine. That means I’ve been able to do some practice splicing. As a result we can see how the Shrouds and Chainplates are going to work.
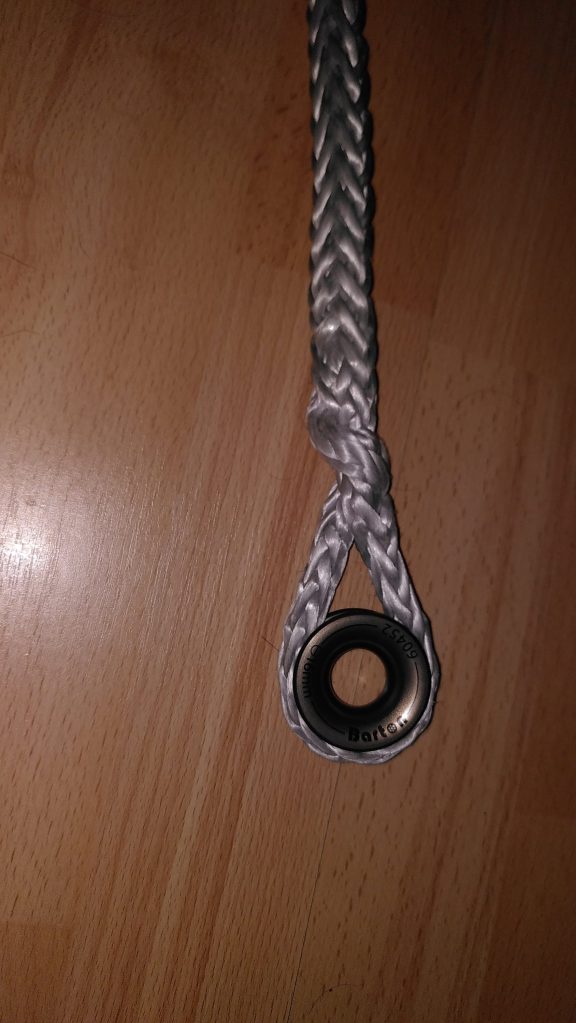
The first image shows my very first Dyneema Eye Splice. It isn’t very good, but that isn’t a surprise. I’m going to make sure I practice lots before the first real splice 🙂 This is a Möbius Brummel splice (which means it is locked in two directions with a long straight bury. To see how to do this splice see this video from Rigging Doctor. As Dyneema is slippery you need to bury a tail that is 72 times the diameter of the line in length. Our Mizzen Shrouds are 9mm (for reasoning behind that choice see The mysteries of sizing Dyneema standing rigging). For simplicity and an overabundance of caution I decided on 720mm of bury (I think I ended up with about 680mm on this first attempt). The double locking stops the splice from slipping but another key to the strength is tapering the buried portion (so there are no kinks caused by sudden changes in direction for the fibres), my taper ended up being 360mm long. I’ve put a low friction ring in this eye splice which is what will be used at the bottom of the shroud. At the top another eye splice will be fitted to the custom tangs I’m going to make.
Now we have my first attempt to make a chainplate loop. This is also very simple. It is essentially a soft shackle with overhand knot (I tried this one without the soft shackle eye but will put that in the next one). A video on how to make this is here. As I didn’t make the soft shackle eye I’ve put a simple whipping to hold the low friction ring. This started as 3m (3000mm) of 9mm Dyneema and has ended up being about 300mm sticking out above the overhand knot. This uses 2 simple Brummel splices which the loop goes through so that they go around the overhand know,. As the buried tail reaches all the way upto the whipping it can’t slip as it is going all through the knot. Nor can the knot slip because the tails are these eye splices held by the main loop.
This one is only pulled hand tight at the moment. I’m going to have to make some kind of rig to properly tension these to get the knots tight before I install them.
To install them the chainplate is basically a big backing plate with a hole going through it and the deck. The loop (without the low friction ring) is push through the hole from below. The knot can’t fit through the hole in the backing plate. The low friction ring is inserted and now you have a secure point to attach the shroud to.
I’m guessing I can reduce the length of the original line to 2.5m and the buries to 600mm without any significant strength loss. That would place the low friction ring at about 200mm above the deck which is just about what I am looking for. Rremember that Dyneema rigging is sized for stretch not strength, so even with the splice it should be more than 3 times stronger than the stainless steel it replaces. I will do some strength testing but don’t think I can affordably or safely achieve a 10,000kg pull.

Here they are together. They get joined by a 6mm dyneema lashing, that loops between the two low friction rings. When you pull on the tail of the lashing it gives you a mechanical advantage (more will be needed to get enough tension),

Neither of these were difficult to make. I managed both in a couple of hours. I’ve ordered some extra splicing tools and special dyneema knife and scissors (it is very hard to cut!!). My next practices will be on 6mm Dyneema which is for the guardrails/lifelines and the shroud lashings.
We had another delivery today, some Mild Steel Angle Iron which I am hoping to use to repair the platform on my drill press. I have plans to use that to help make the tangs for the top end of the shrouds.

Leave a comment